伸縮の設定
GUI をもつソフトウェアは、広い画面で実行した時はそれなりのメリットがある方が良いです。 画面の伸縮に合わせて、GUI コンポーネントの配置場所も自動的に変わるのが望ましいです。
ここでは、JavaFX における基本的な画面の伸縮設定について説明します。
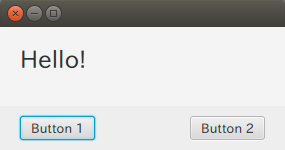
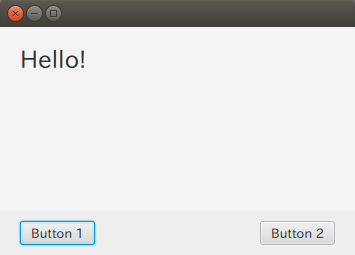
ここでみる画面は次のような動きをします。


下部のボタンはウィンドウの下部にはりつき、幅の伸縮に対しても、片方のボタンは右側へ、 もう片方のボタンは左側にはりついています。
これの実装のポイントは次の通りです。
- 画面全体を BorderPane をベースにする
- 左右の伸縮については HGrow 属性を構成した Pane を配置する
FXML ファイルは次の通りです。
<?xml version="1.0" encoding="UTF-8"?>

<?import javafx.geometry.Insets?>
<?import javafx.scene.control.Button?>
<?import javafx.scene.control.Label?>
<?import javafx.scene.layout.BorderPane?>
<?import javafx.scene.layout.HBox?>
<?import javafx.scene.layout.Pane?>
<?import javafx.scene.layout.VBox?>
<?import javafx.scene.text.Font?>

<BorderPane minWidth="200.0"
	xmlns="http://javafx.com/javafx/8.0.171"
	xmlns:fx="http://javafx.com/fxml/1"
	fx:controller="application.MainViewController">
	<center>
		<VBox prefHeight="100.0" prefWidth="400.0"
			BorderPane.alignment="CENTER">
			<children>
				<Label text="Hello!">
					<VBox.margin>
						<Insets bottom="20.0" left="20.0" right="20.0" top="20.0" />
					</VBox.margin>
					<font>
						<Font size="24.0" />
					</font>
				</Label>
			</children>
		</VBox>
	</center>
	<bottom>
		<HBox prefHeight="33.0" prefWidth="400.0"
			style="-fx-background-color: #eeeeee;" BorderPane.alignment="CENTER">
			<children>
				<Button minWidth="75.0" mnemonicParsing="false"
					text="Button 1">
					<HBox.margin>
						<Insets bottom="10.0" left="20.0" right="20.0" top="10.0" />
					</HBox.margin>
				</Button>
				<Pane prefHeight="23.0" prefWidth="250.0" HBox.hgrow="ALWAYS" />
				<Button minWidth="75.0" mnemonicParsing="false"
					text="Button 2">
					<HBox.margin>
						<Insets bottom="10.0" left="20.0" right="20.0" top="10.0" />
					</HBox.margin>
				</Button>
			</children>
		</HBox>
	</bottom>
</BorderPane>
画面下部にはりつく領域は BorderPane を親にすることで作成できます。
また、その下部の領域内では HBox で左右の伸縮をしますが、基本的に存在しない領域はレンダーされないので Pane なりを配置し、 その伸縮設定 HGrow を ALWAYS にすることで、常にこの領域を優先的に伸縮させることになります。